Intentacles

Part X

Arms with affirmation. Limbs without limits. Feelers with feeling? Current project: how do you hold hands with someone 2,700 miles away?

Hands are complicated. There are drawing classes where students focus on heads, feet and hands for an entire semester. Our fingerprints are unique and our palm markings change over time. We can support our entire body weight on a few fingertips. Hands have one of the highest sensory capacities of the body. Our hands can embody an entire language.

Do you know what else has some impressive appendages? The octopus. They use their tentacles for locomotion, fighting, tasting and exploring (They also have three hearts, but that’s a project for another time). Yet no matter how exceptional hands and tentacles are, I still cannot reach mine across the U.S.

I had to pretend a little. I also went with the octopus, because a pointed tube is easier to shape out of fabric than digits. I drafted a pattern of a tentacle and sewed a mock up so I had a good idea of what the finished product would look like. I made a few adaptations, and then cut out my pieces, leaving a generous seam allowance (just in case). After a soda ash soak, I used Rit and very old (vintage!) ink to stain the fabric. For the back side, I used a shibori technique that involved wrapping the fabric around some rope and then compressing it. The representation of the suckers was produced by dropping ink onto damp fabric.


Next, I used fabric paint to accentuate the existing dye patterns.


I sewed the pieces together, leaving a space for stuffing. I fitted the bottom with a piece of cardboard and a weight to add stability. I glued neodymium magnets to the inside of each tentacle. I also included a reminder to share my heart.  The tentacles were stuffed with shredded memory foam and fiberfill.


Although pleased with the outcome, I didn’t leave quite enough room to hold hands in the chaste way I envisioned. They ended up being a bit more intimate than anticipated.


Part O

My counterpart took a more literal approach to the hand holding quandary. After a few tutorials in casting, he used alginate to make an impression of his hand and used silicone to fill the negative space. The result was an accurate reproduction of his left hand with exceptional detail regarding skin texture, nails and palm lines.

He did magic things with wires, a circuit board and battery (actually the process was explained to me several times, but, magic). When the battery is engaged, the hand glows red. According to B., it didn’t work out like he planned. There are a few components he wants to redefine. Ideally the hand responds to computer commands, all of the hardware is hidden within and the silicone has swirly sparkles (that’s mine). Considering that this was the first time B. worked with these techniques and materials, I think it was a successful first attempt. It is wonderful parts creepy and techy. I love it. And I will be boarding a plane at the end of the month.

By the power of Speedball (I have the power)

I’ve had this post in my draft box for two years. It was going to be a critique and comparison about Do It Yourself crafting, fine art and where the two overlap.

Where’s my Venn diagram?

Instead, let’s talk about making art approachable and accessible to beginners in terms of technique and expense by using the following example.

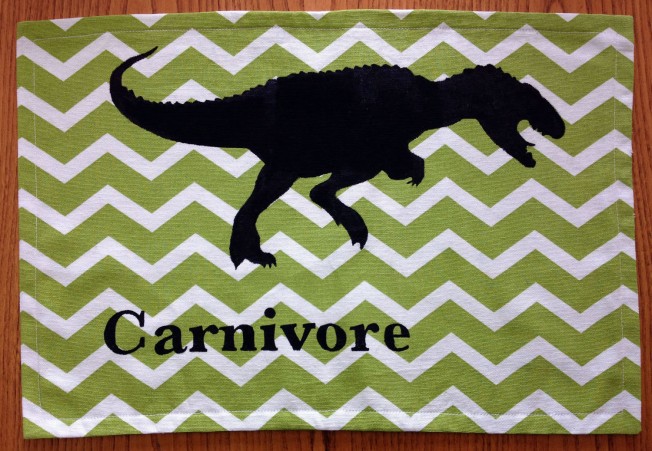
This was a screen printing project; a gift for my bestie’s husband. He is a fan of placemats. And who isn’t a fan of dinosaurs?

Completed carnivore dino placemat

There are a number of ways to go about a screen print. A kit at Dick Blick will run a person anywhere from $25.00 to $472.00, depending on how serious you are about it. The basics are going to include a frame/screen, a squeegee, screen filler, drawing fluid, a brush and, hopefully, an instruction manual. Other materials include photo emulsion, photo emulsion remover, sensitizer, lighting, transparencies, tape and solvent. Whew!

So what if we break it down to five items that can get the job done? A screen, a roll of tape, a shower curtain liner, a defunct gift card and ink. It’s a little less intimidating than photo emulsion and if it turns out you hate screen printing, you haven’t invested too much in supplies.

You can use a piece of shower curtain to create a stencil. The plastic is thick enough to withstand multiple printings, easy to cut with a blade and disposable enough that you’re not going to feel too guilty when you mess up. Tape off your screen. This helps with clean up later. I like to tape my stencil to the back of my screen to ensure it will not slide, but usually it will stay put with ink/pressure. Put some ink at the top of your image and use your gift card to pull the ink through the screen.

Stencils can be as simple, or complicated as you want to make them and the printed results are indistinguishable from a more professional setup.

You might have noticed this post is not a step by step process. There are a lot of tutorials already out there. Check out this one by Catspit Productions:

https://www.youtube.com/watch?v=ND1AUJhdUZc

And while there are other parts of the screen printing process like prepping your screen and registering your image, it doesn’t have to be complicated. Throw that stencil on your screen and have at it. Making art does not have to be cost prohibitive and creating   beautiful/crafty/functional prints is within your power.

Think Fast!

In June the gallery manager and curator of the Bellefonte Art Museum asked if I had a textile piece I would like to install in their Sharon McCarthy Memorial Garden. I said “Yes, I would love to,” knowing that I had nothing appropriate. After all, I had three months. It was an unusual space, outside and under a staircase.

Under the Staircase

I thought about it in an abstract sense for the first two months. In the meantime I took road trips to the Outer Banks and Indiana, started talking to my estranged ex and accepted a full time job as a social worker. At month three I realized belatedly, I didn’t want to make a two dimensional piece. In an unrelated thought process (Oh, but it’s all related) I was reflecting about how difficult it was to place many ocean creatures as flora or fauna. I immediately decided to make something reminiscent of sea tubes and barnacles. Unfortunately, my mock ups were a little too reminiscent of other animal parts. A lot of artists explore sexuality and the duality of the masculine and feminine, but I had just inadvertently mocked up a strap-on and a fleshlight. After an emergency critique from a friend, the tube got tossed and the fleshlight became a sessile suspension feeder once again.

mockups

And now with a secure vision and two weeks until the install date I had to manufacture 35 softly structured hexagons of various sizes, complete with lining and batting. That’s 630 pieces of fabric. They needed to be cut, tied, dyed, adorned and sewn. Totally under control.

patterncutouts

dyebath

sewing

I had originally wanted the barnacles to connect together seamlessly in a smooshy, randomized fabric U shape. I also wanted it to have interactive qualities. To reach that end, I put two to three neodymium magnets in each barnacle so that they could be playfully rearranged. It was only partially successful. The magnets I used were strong enough to attach the pieces, but too difficult to find quickly once embedded in the fabric. I needed larger magnets for the barnacles to have actually supported each other without some sort of secondary attachment. My friend and I, at the last minute, attached the barnacles to a cotton fishing net (authentic ocean smell!) with tiny brass safety pins. The choice made the shapes less abstract and more representational. However, once the installation is down, the barnacles will be abstracted once again and able to be piled and maneuvered with the magnets as the stabilizing factor.

Barnacles on Parade

In Progress

Once I hit the sewing stage, I got a little bit panicky. The project being under control was an illusion. I still had a week, but my new job also started within that time frame. After a few days without sleep, I enlisted my friends and family, shelving the question Is it still my art if someone else fabricates it? I was still sewing the Saturday morning of the install date before I left for my current job. After work, I rushed back home, gathered the almost completely finished barnacles and rushed them and my friend to the museum. We spent three hours installing the piece and finished at the last possible moment.

Full Front

Full Side

thinkfast

Close Up

I received positive feedback from the gallery. Always appreciated. And I was able to return to seven glorious hours of sleep a night.

Mom, Bonnie, Karen, Abby and Ben- THANK YOU for your help.