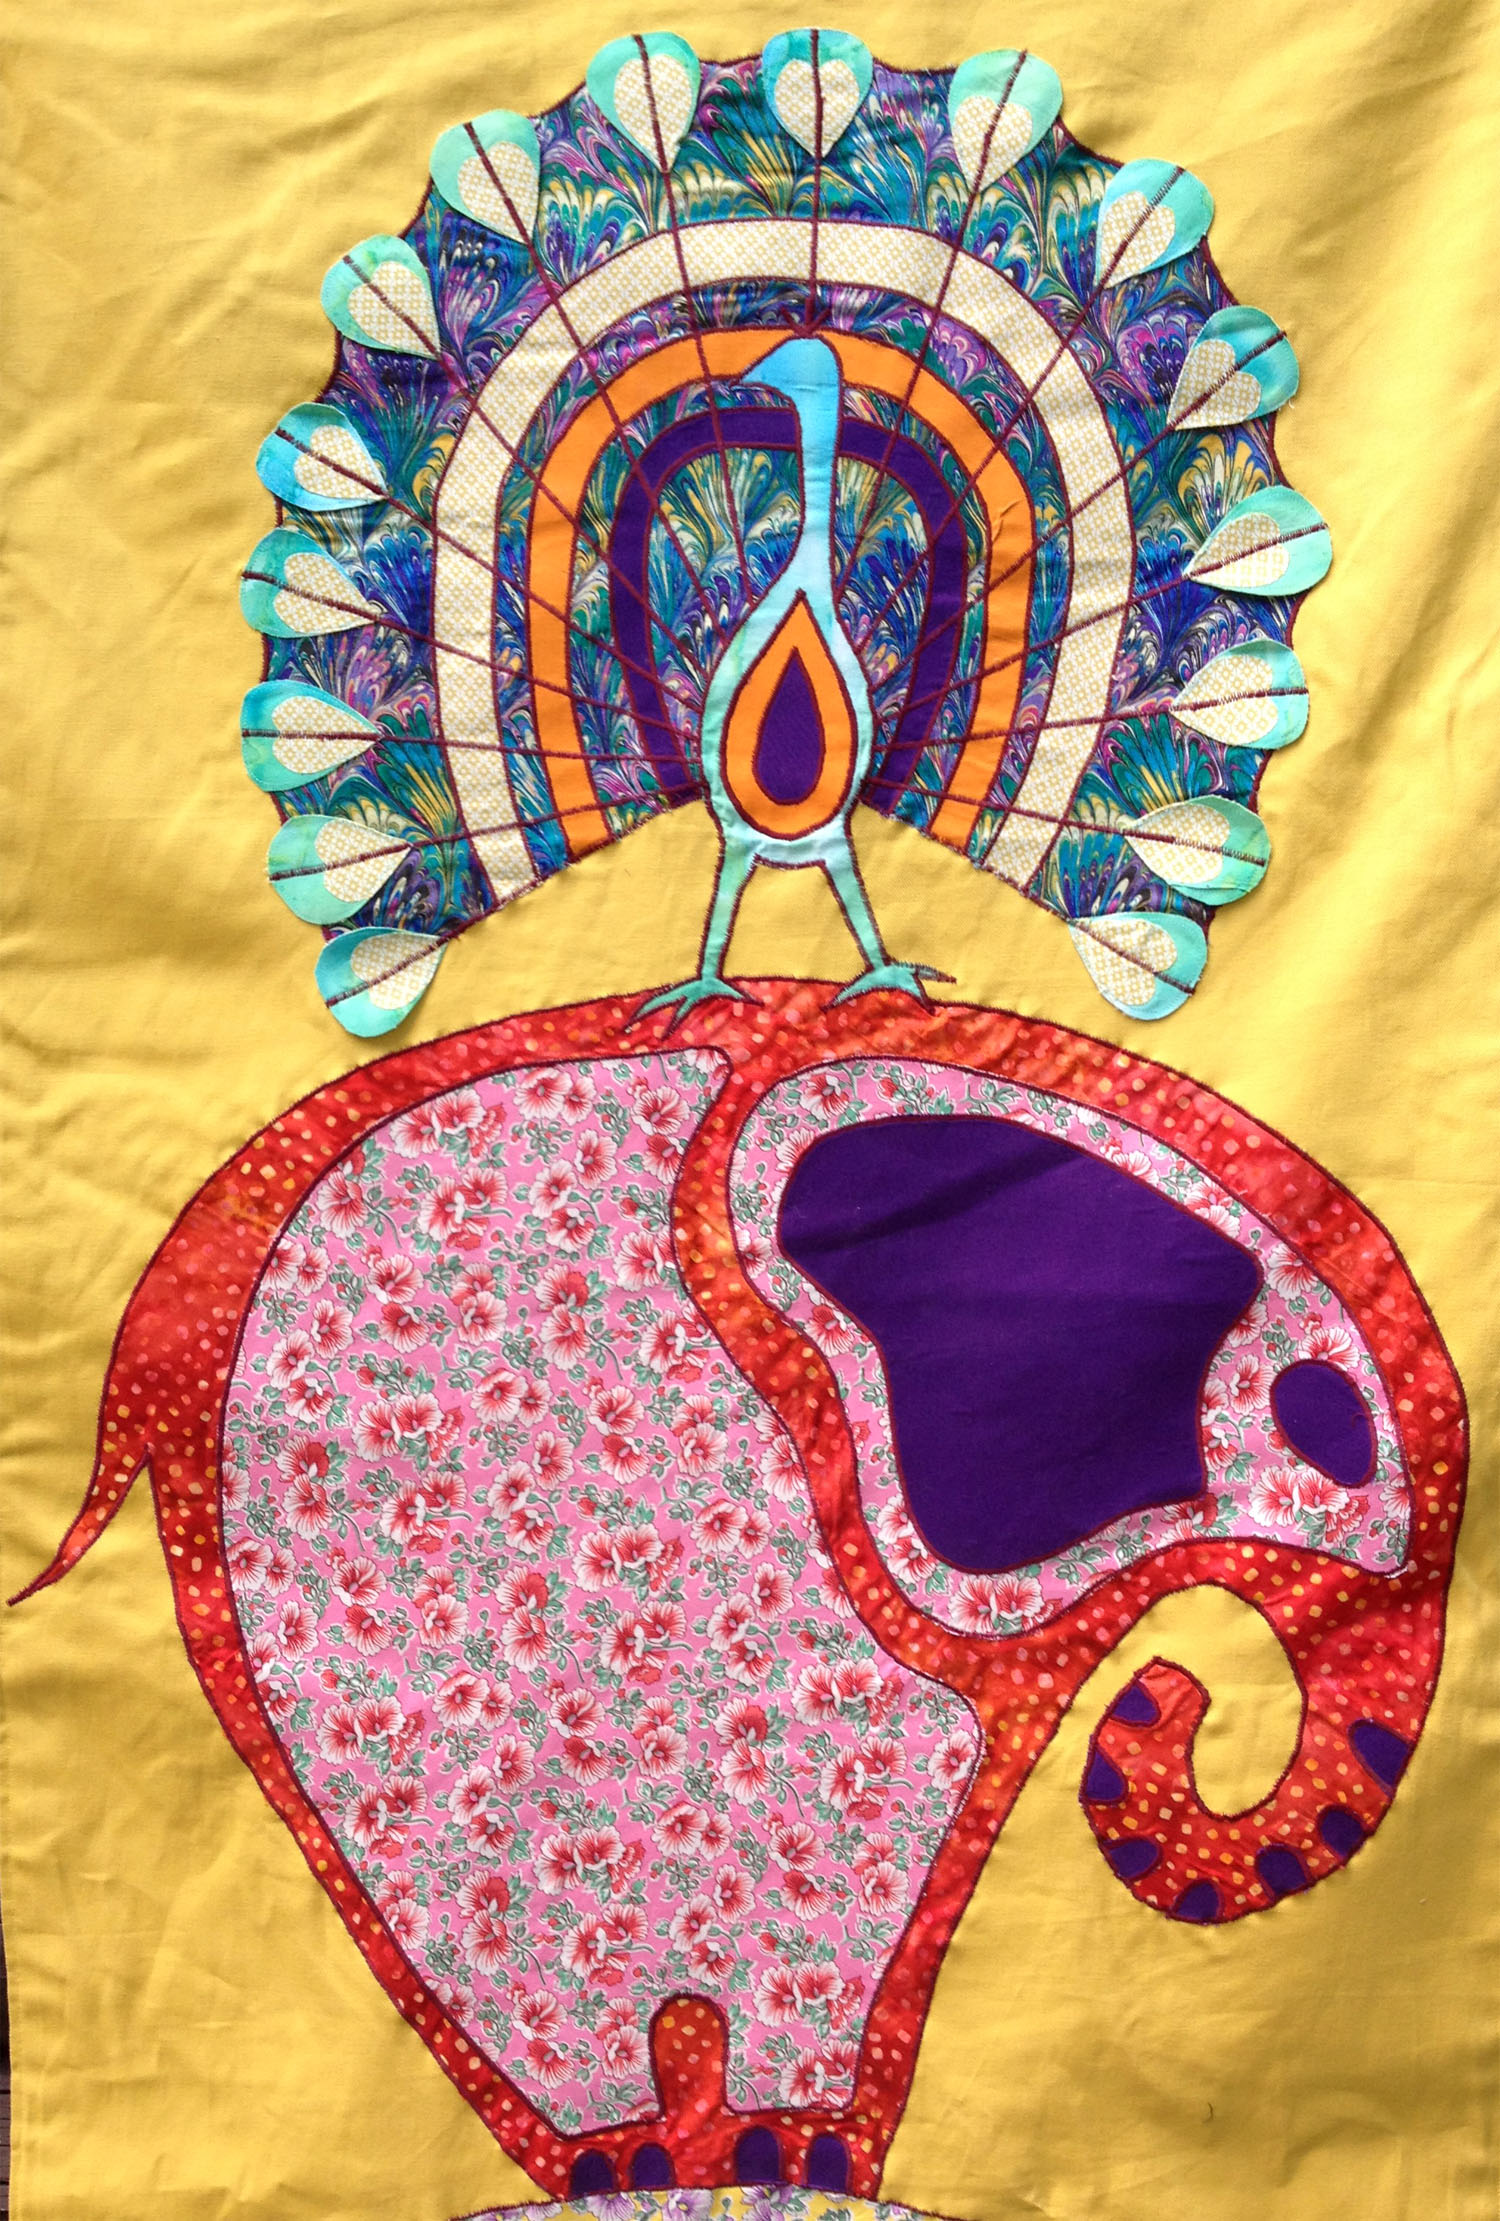
Intentacles

Part X

Arms with affirmation. Limbs without limits. Feelers with feeling? Current project: how do you hold hands with someone 2,700 miles away?

Hands are complicated. There are drawing classes where students focus on heads, feet and hands for an entire semester. Our fingerprints are unique and our palm markings change over time. We can support our entire body weight on a few fingertips. Hands have one of the highest sensory capacities of the body. Our hands can embody an entire language.

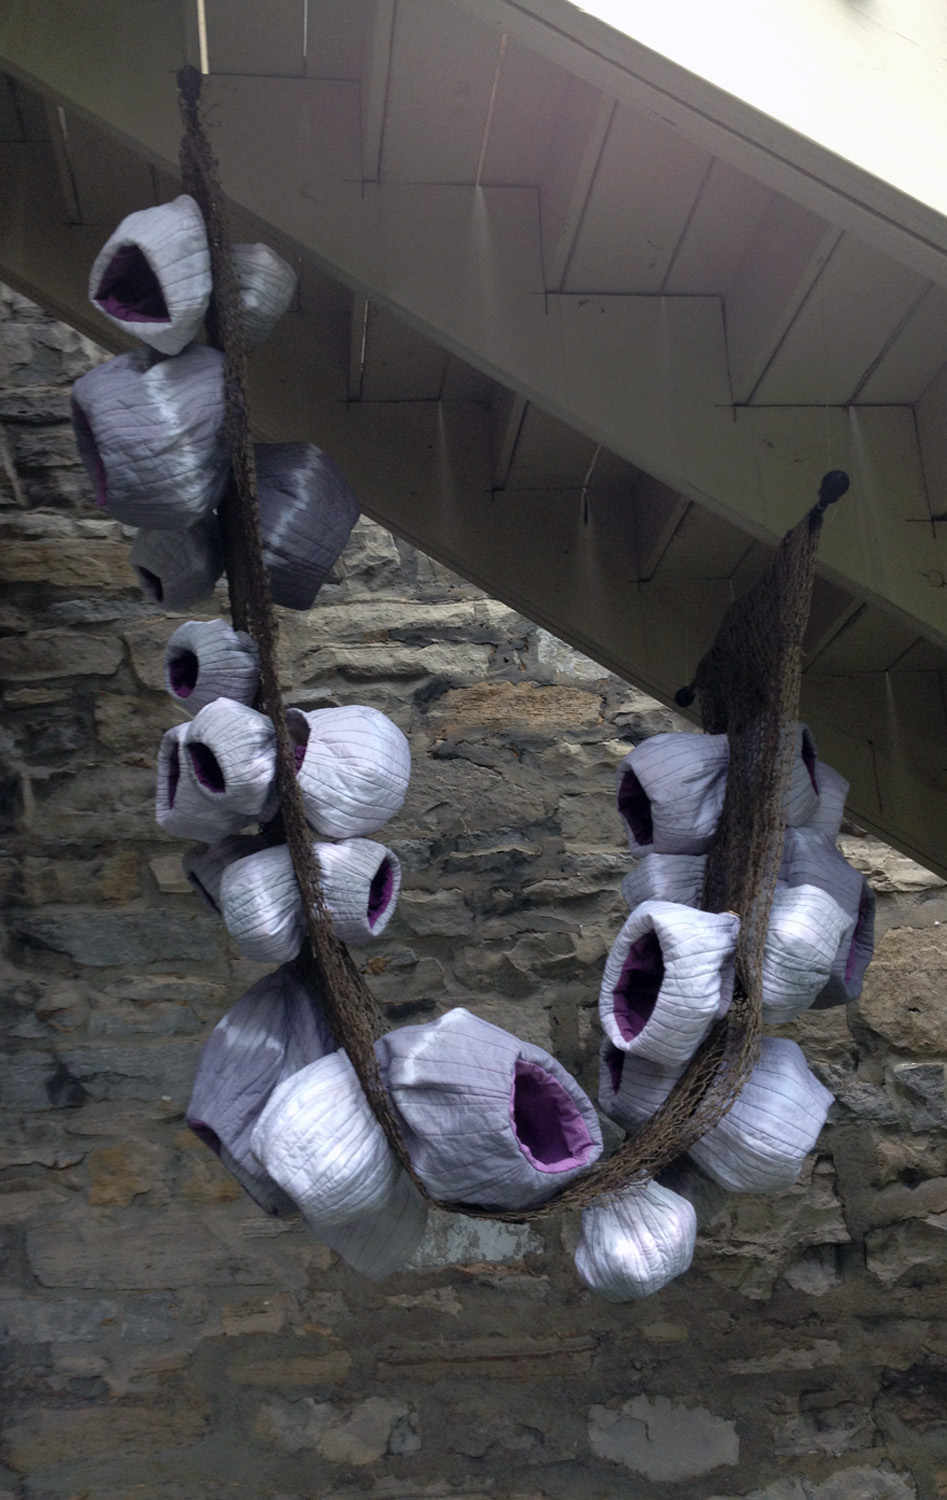
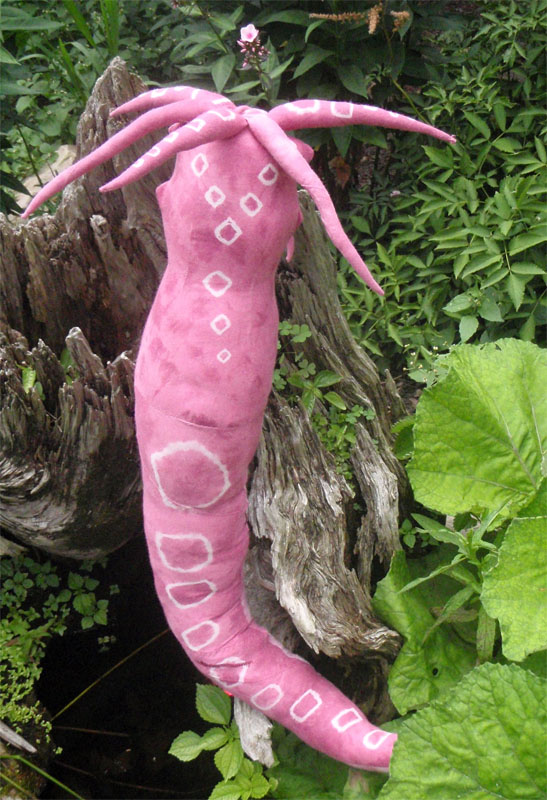
Do you know what else has some impressive appendages? The octopus. They use their tentacles for locomotion, fighting, tasting and exploring (They also have three hearts, but that’s a project for another time). Yet no matter how exceptional hands and tentacles are, I still cannot reach mine across the U.S.

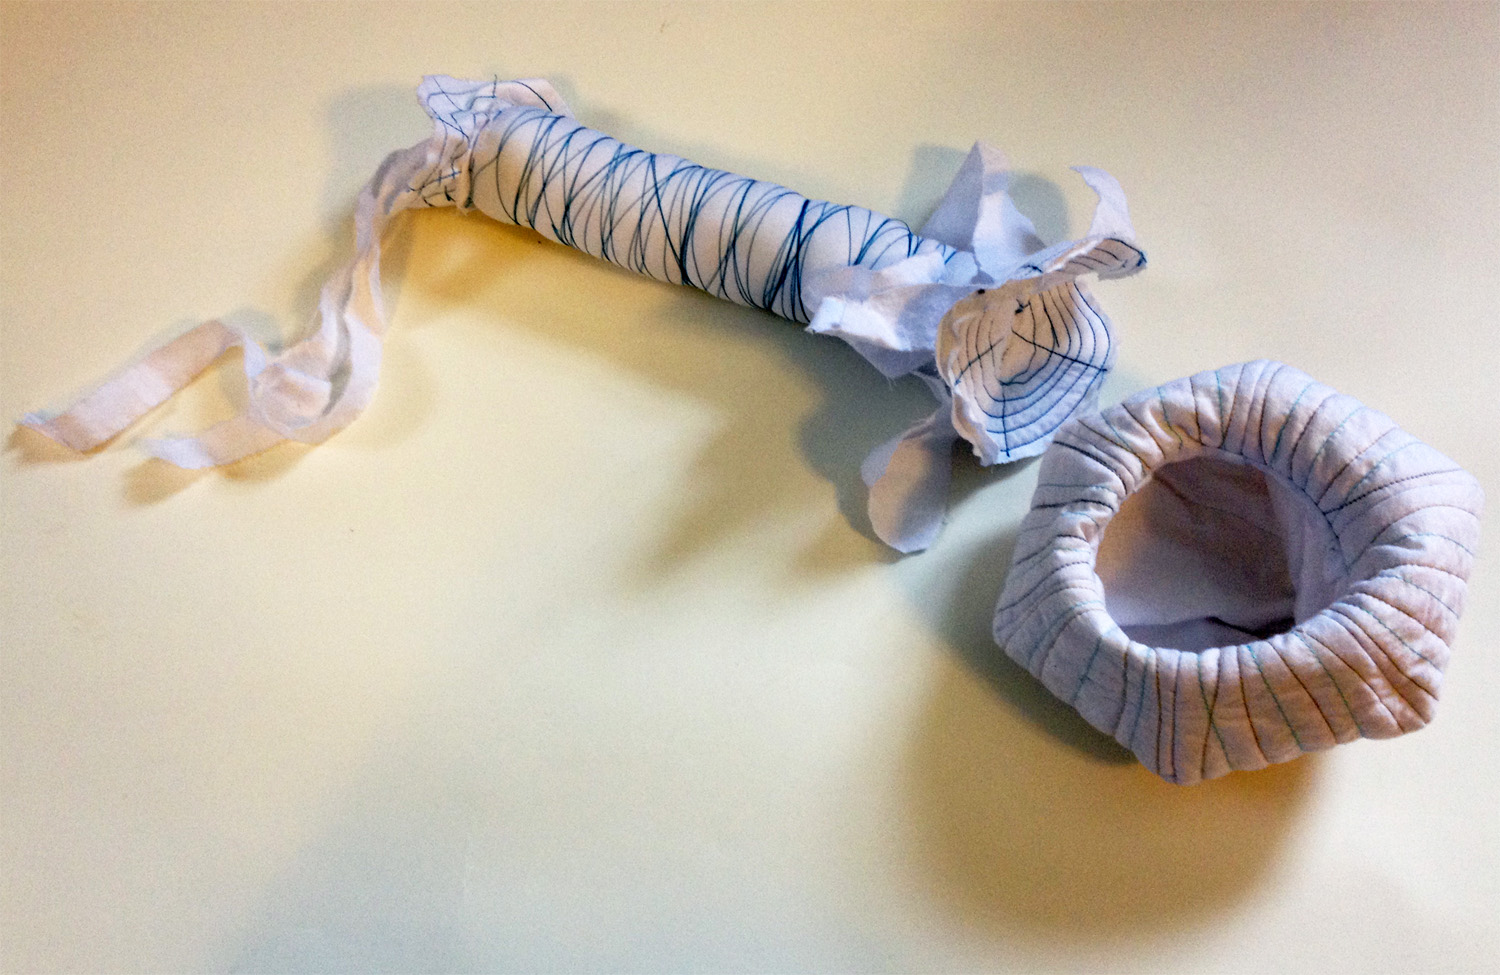
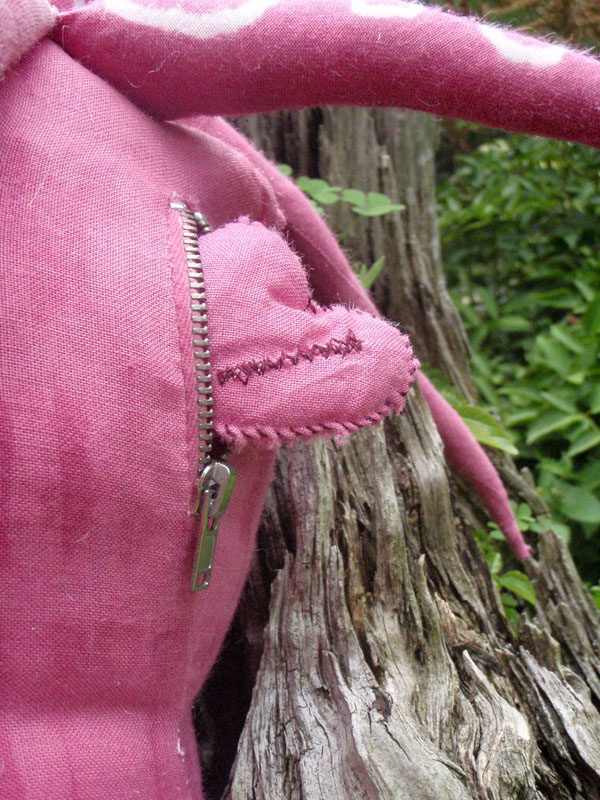
I had to pretend a little. I also went with the octopus, because a pointed tube is easier to shape out of fabric than digits. I drafted a pattern of a tentacle and sewed a mock up so I had a good idea of what the finished product would look like. I made a few adaptations, and then cut out my pieces, leaving a generous seam allowance (just in case). After a soda ash soak, I used Rit and very old (vintage!) ink to stain the fabric. For the back side, I used a shibori technique that involved wrapping the fabric around some rope and then compressing it. The representation of the suckers was produced by dropping ink onto damp fabric.


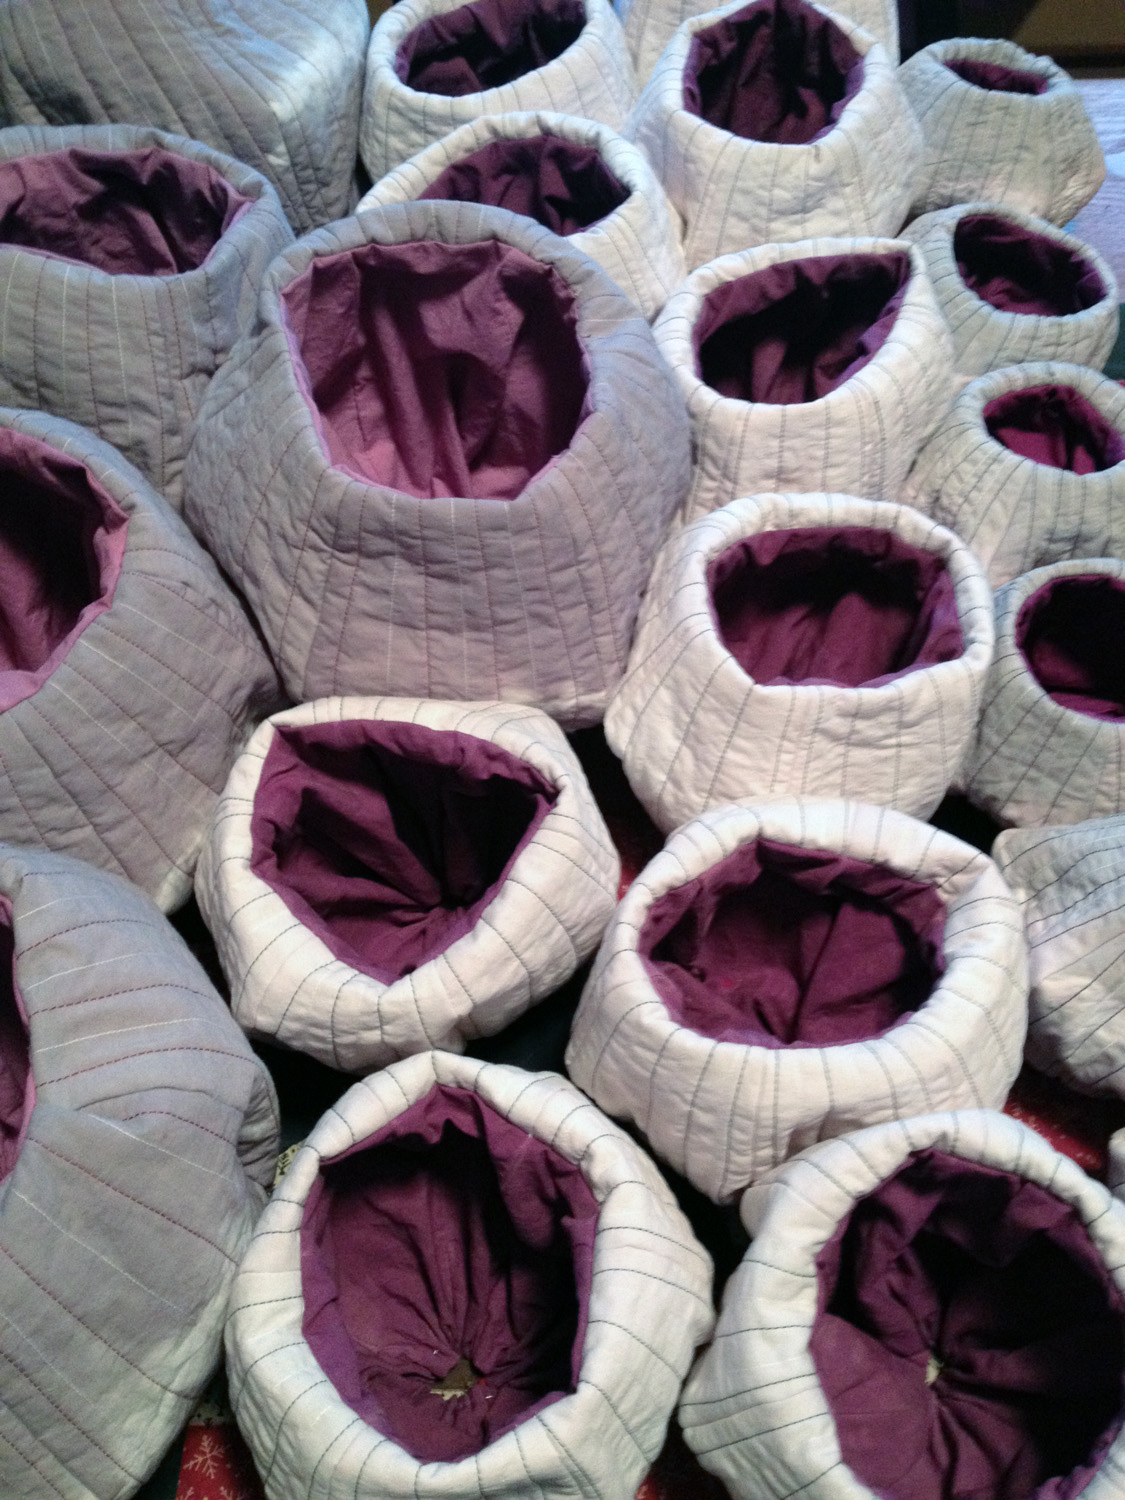
Next, I used fabric paint to accentuate the existing dye patterns.


I sewed the pieces together, leaving a space for stuffing. I fitted the bottom with a piece of cardboard and a weight to add stability. I glued neodymium magnets to the inside of each tentacle. I also included a reminder to share my heart.  The tentacles were stuffed with shredded memory foam and fiberfill.


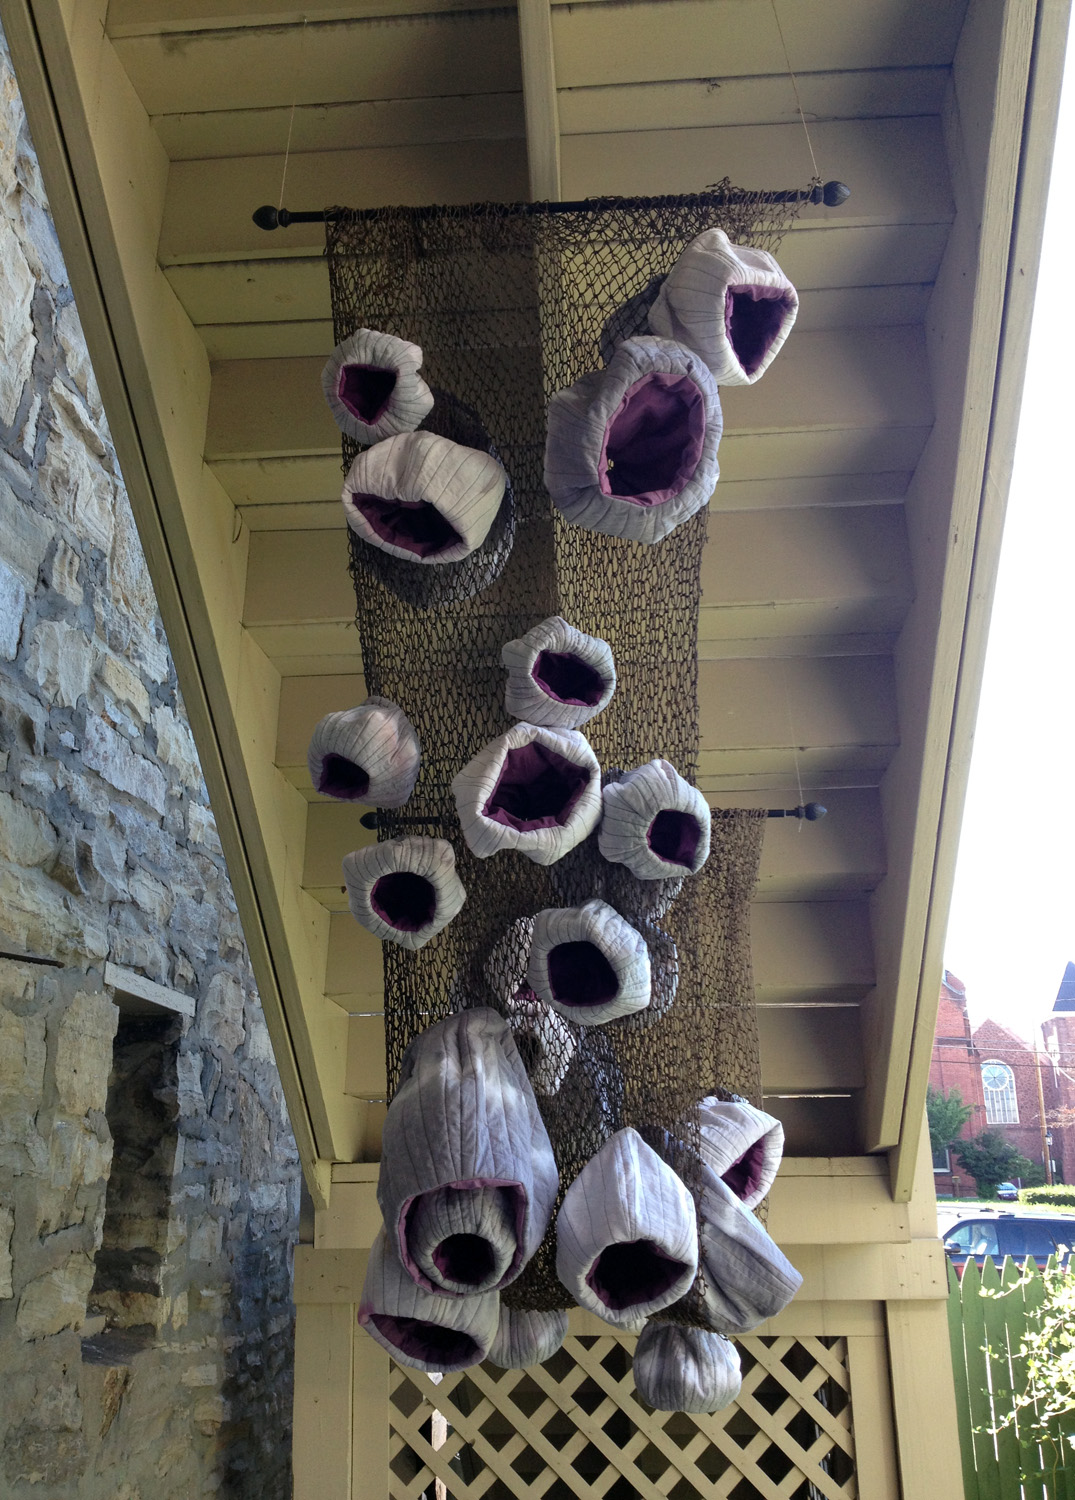
Although pleased with the outcome, I didn’t leave quite enough room to hold hands in the chaste way I envisioned. They ended up being a bit more intimate than anticipated.


Part O

My counterpart took a more literal approach to the hand holding quandary. After a few tutorials in casting, he used alginate to make an impression of his hand and used silicone to fill the negative space. The result was an accurate reproduction of his left hand with exceptional detail regarding skin texture, nails and palm lines.

He did magic things with wires, a circuit board and battery (actually the process was explained to me several times, but, magic). When the battery is engaged, the hand glows red. According to B., it didn’t work out like he planned. There are a few components he wants to redefine. Ideally the hand responds to computer commands, all of the hardware is hidden within and the silicone has swirly sparkles (that’s mine). Considering that this was the first time B. worked with these techniques and materials, I think it was a successful first attempt. It is wonderful parts creepy and techy. I love it. And I will be boarding a plane at the end of the month.

By the power of Speedball (I have the power)

I’ve had this post in my draft box for two years. It was going to be a critique and comparison about Do It Yourself crafting, fine art and where the two overlap.

Where’s my Venn diagram?

Instead, let’s talk about making art approachable and accessible to beginners in terms of technique and expense by using the following example.

This was a screen printing project; a gift for my bestie’s husband. He is a fan of placemats. And who isn’t a fan of dinosaurs?

Completed carnivore dino placemat

There are a number of ways to go about a screen print. A kit at Dick Blick will run a person anywhere from $25.00 to $472.00, depending on how serious you are about it. The basics are going to include a frame/screen, a squeegee, screen filler, drawing fluid, a brush and, hopefully, an instruction manual. Other materials include photo emulsion, photo emulsion remover, sensitizer, lighting, transparencies, tape and solvent. Whew!

So what if we break it down to five items that can get the job done? A screen, a roll of tape, a shower curtain liner, a defunct gift card and ink. It’s a little less intimidating than photo emulsion and if it turns out you hate screen printing, you haven’t invested too much in supplies.

You can use a piece of shower curtain to create a stencil. The plastic is thick enough to withstand multiple printings, easy to cut with a blade and disposable enough that you’re not going to feel too guilty when you mess up. Tape off your screen. This helps with clean up later. I like to tape my stencil to the back of my screen to ensure it will not slide, but usually it will stay put with ink/pressure. Put some ink at the top of your image and use your gift card to pull the ink through the screen.

Stencils can be as simple, or complicated as you want to make them and the printed results are indistinguishable from a more professional setup.

You might have noticed this post is not a step by step process. There are a lot of tutorials already out there. Check out this one by Catspit Productions:

https://www.youtube.com/watch?v=ND1AUJhdUZc

And while there are other parts of the screen printing process like prepping your screen and registering your image, it doesn’t have to be complicated. Throw that stencil on your screen and have at it. Making art does not have to be cost prohibitive and creating   beautiful/crafty/functional prints is within your power.

The Odyssey

The Odyssey, for anyone who doesn’t remember, or didn’t get around to reading it, is the story of Odysseus and his long return home after the Trojan war. Over the course of a decade Odysseus and his crew face monsters, deities and narcotics until they finally reach Ithaca, where O arrives just in time to slaughter a bunch of suitors, housemaids and goatherds, and reunite with his family.

This was the theme of the mobile my darling friend asked if I would make for her soon to be born son. It fit her requirements of educational, included her husband’s love of Greek mythology and fulfilled my deep set desire to make monsters.

I don’t usually take on the classic works of other artists. I don’t like to make master copies when I paint. When I make books, I rarely use text that isn’t mine. I have trouble following textile patterns to the letter. So, how was I going to make the characters in this story mine? And more importantly, how was I going to baby proof it?

I narrowed down the pieces to ten; one for each year O was gone. I used batik fabric as the ground and kept the shapes squishy and amorphous. I painted the figures in black- a nod to black-figure style and the developmental considerations of baby. Keeping child friendly in mind helped to direct the imagery.

In no particular order:

The ship. Odysseus’ ship has no name. Just like his horse.

(pic soon)

Odysseus. Our hero. He’s holding a bag of winds, a gift from Aeolus to blow him home. Unfortunately his crew members open it and they are blown back to start.

The Lotus Eaters. O and his crew get blown off course and end up in a land where the inhabitants eat lotus fruits which have a pleasant, yet addictive narcotic effect (I always imagined a cross between the fruitarian Eloi in The Time Machine and the Bar-ba-loot bears in The Lorax). This is the kid’s favorite.

The Sirens. These ladies are monsters/mermaids/divas who lure men to their death through their song. In order to survive, the crew close their ears with wax and tie O to the mast because of his incurable curiosity and inability to say no to a pretty face.

Scylla. She is a six headed monster with a triple row of razor teeth and twelve legs. She accessorizes with a belt of barking dog heads. She is a voracious eater. And super hard to make child friendly. My favorite.

Charbydis. Charbydis is Scylla’s BFF and neighbor. Her head is a giant whirlpool.

charbydisplush

Calypso. She is a sexy nymph and Odysseus spends seven years with her until he remembers he has a wife. She is often portrayed riding with dolphins. Also into weaving.

The Laestrygonians. A race of giant cannibals who in addition to eating the crew wrecked havoc on the ships. Also not easy to child proof.

cannibalplush

You might have noticed there are only eight pieces here. Unfortunately, I never completed the last two. I had them sketched out, but couldn’t craft an image I was pleased with. Although the mobile is functioning, it’s not truly complete.

The final two:

Polyphemus. A cyclops and sheep herder who holds O and his crew captive after they steal and eat his sheep. He kills O’s men and O pokes his eye out with a sharp stick. My version is a farmer in overalls with an oversized head mostly filled by an eye. Sheep abound.

Circe. Another beautiful woman. Her hobbies are sorcery and turning men into pigs. O accepts an invitation into her bed and it takes him a year to get back out of it. I envision her as a chemist holding up a sparkling test tube with a porcine creature under her arm.

I used an embroidery hoop as the base of the mobile and sewn loops of fabric to secure the pieces to it. When I find my video of the mobile in action, I will post it.

Stay tuned for the plushies!


Think Fast!

In June the gallery manager and curator of the Bellefonte Art Museum asked if I had a textile piece I would like to install in their Sharon McCarthy Memorial Garden. I said “Yes, I would love to,” knowing that I had nothing appropriate. After all, I had three months. It was an unusual space, outside and under a staircase.

Under the Staircase

I thought about it in an abstract sense for the first two months. In the meantime I took road trips to the Outer Banks and Indiana, started talking to my estranged ex and accepted a full time job as a social worker. At month three I realized belatedly, I didn’t want to make a two dimensional piece. In an unrelated thought process (Oh, but it’s all related) I was reflecting about how difficult it was to place many ocean creatures as flora or fauna. I immediately decided to make something reminiscent of sea tubes and barnacles. Unfortunately, my mock ups were a little too reminiscent of other animal parts. A lot of artists explore sexuality and the duality of the masculine and feminine, but I had just inadvertently mocked up a strap-on and a fleshlight. After an emergency critique from a friend, the tube got tossed and the fleshlight became a sessile suspension feeder once again.

mockups

And now with a secure vision and two weeks until the install date I had to manufacture 35 softly structured hexagons of various sizes, complete with lining and batting. That’s 630 pieces of fabric. They needed to be cut, tied, dyed, adorned and sewn. Totally under control.

patterncutouts

dyebath

sewing

I had originally wanted the barnacles to connect together seamlessly in a smooshy, randomized fabric U shape. I also wanted it to have interactive qualities. To reach that end, I put two to three neodymium magnets in each barnacle so that they could be playfully rearranged. It was only partially successful. The magnets I used were strong enough to attach the pieces, but too difficult to find quickly once embedded in the fabric. I needed larger magnets for the barnacles to have actually supported each other without some sort of secondary attachment. My friend and I, at the last minute, attached the barnacles to a cotton fishing net (authentic ocean smell!) with tiny brass safety pins. The choice made the shapes less abstract and more representational. However, once the installation is down, the barnacles will be abstracted once again and able to be piled and maneuvered with the magnets as the stabilizing factor.

Barnacles on Parade

In Progress

Once I hit the sewing stage, I got a little bit panicky. The project being under control was an illusion. I still had a week, but my new job also started within that time frame. After a few days without sleep, I enlisted my friends and family, shelving the question Is it still my art if someone else fabricates it? I was still sewing the Saturday morning of the install date before I left for my current job. After work, I rushed back home, gathered the almost completely finished barnacles and rushed them and my friend to the museum. We spent three hours installing the piece and finished at the last possible moment.

Full Front

Full Side

thinkfast

Close Up

I received positive feedback from the gallery. Always appreciated. And I was able to return to seven glorious hours of sleep a night.

Mom, Bonnie, Karen, Abby and Ben- THANK YOU for your help.

All Manner of Banners: 2014 Arts Fest Banner Competition

Every year from July 9th through the 13th, State College shuts down its streets and welcomes hundreds of artists into town for the Pennsylvania Festival of the Arts. As a kid I remember looking at tent upon tent of beautiful creations, being gastronomically enticed by vendors selling strudels and kabobs, hearing music everywhere and above it all were banners floating in the sky. As an adult, I am, dare I say, a bit more cynical about it all, but I still enjoy perusing the art, sampling the edibles and listening to whatever band is playing at the Festival Shell. And I still dig the banners. They’re everywhere, all colors and themes, reigning over the festival.

I’ve always wanted to make one and this was the year. First, I had to come to terms with the banner size- 72″ x 30″- which I’m sure is perfectly normal in bannerland, but it is more fabric than I am used to working with at one time. The banner hangs fifteen to twenty feet above the ground, so I needed imagery with clear color and definition. I adapted a scarf design I made a few years ago to fit the required shape (thank you Dad, for the use of your projector).  I used yellow canvas bought at the local fabric store for the base and the rest of the cotton was donated by a generous friend. The pieces were cut and stabilized with double-sided fusible interfacing. I sat down and had a quiet talk with my sewing machine and proceeded to applique my heart out. At some point I came up for breath and tea. Hours later, covered in thread, I had twelve feet of fabric with two peacocks and four elephants adhered to it. I folded it over, created space for a dowel at the top, sewed in a metal rod at the bottom for weight (the festival site suggests chain, but that is unwieldy and unattractive) and just like that, I had a banner. On time, even.

Trunks and Tails placed third in the professional category of this year’s competition. The awards ceremony is Saturday, July 12, 9 a.m. at the Allen Street Stage if you care to check it out. Next year, I’m taking first place.

Banner, side A Banner, side B

Yellow elephant closeupRed elephant, closeup

Elephant and peacobk closeup

Peacock closeup

P.S. The books arts are represented this year by Kirstin Demer of Green Trike Press and Regina and Daniel St. John of Chena River Marblers. Check the Arts Fest website for their locations and support the arts!

Christmas Quandry

This past Christmas a good friend subtly hinted at what she might like for the holidays by emailing me a template for a handmade Kitchenaid cover. The step-by-step instructions made an already easy project a breeze. Thank you, Debbie!

But let’s back up a minute. Although I received this hint well before December, it wasn’t completed and sent until February. Wait a moment, you say, didn’t you just claim this project was a breeze? Weeelllll, the sewing part was. The picking out the perfect fabric part took me over a month. In the end, I decided to create my own textile design. I cut a small rose stencil from quilter’s template plastic and chose medium weight unbleached cotton to print on. Using a mixture of acrylic and screen printing ink, I sponged paint through my stencil in a somewhat random (yet intentional) pattern. Once it was dry I applied the leaves in the same manner. Then I heat set it with the iron.

Hand stenciled roses

I liked the result, but it still looked too unfinished and country-kitchen for my taste. I decided to outline the flowers in black to make it feel more contemporary. Since the initial goal was quick and easy, I picked up a few fine tipped fabric pens and just to be on the safe side, some Sharpies. I proceeded to outline the stenciled flowers. And do you know what? It looked horrible! As if someone had taken the time to hand stamp a pattern and then just markered the edges. Sigh. That meant I had to outline them using a paintbrush. It took hours. Hours. I had hand, neck and shoulder cramps for days afterward. The results, however, were spectacular.

 Hand stenciled roses with outlines

Once the fabric was painted, the rest came together quickly. I quilted the pieces to encourage structure and stability. Then, a little sewing magic, some piping for purty and bias tape to finish it off. And suddenly, one completed Christmas present.

Kitchenaid cover, front view

Kitchenaid cover, side view

My friend loved it. She couldn’t believe that I found a fabric that fit her tastes so perfectly.

Valley of the doll

Often, when I begin a project I have (mislaid) hopes that it will be pretty. Instead it turns out… wrong. Not in a sense of craftsmanship, or intention, but in a sense of that ain’t right. Mostly, I’m okay with that and occasionally I turn out an elegantsugarpuppy. This isn’t one of those.

Her name is Heidi Hydra, aptly named by her new keeper. I’ve been intrigued by art toys for some time and, more recently, plush dolls. Heidi is the second of what was going to be a series, but I was distracted by other projects (Images of the first can be found here).

Heidi is around twenty-four inches tall, hand-dyed (fiber reactive) and hand and machine sewn from what was once a favorite linen skirt. My friend, Karen B., was kind enough to create her bustier and skirt (also from a pre-existing garment). Heidi has a small pocket over her heart and another where her head should be. I like to think of that one as a retractable stomach, like those of some echinoderms–  I know, every doll should have one.